Posted in 煮食用具 (Cooker), 雞類 (chicken), 越南菜 (Vietnamese Cuisine), 強力及高速攪拌器 (High Speed/Powerful Blender), 低溫慢煮機 (Sous Vide cooker)

[原創食譜 Original Recipe] 越式雞肝醬 – 低溫慢煮版 (Homemade Vietnamese Chicken liver pâté – Sous vide version)

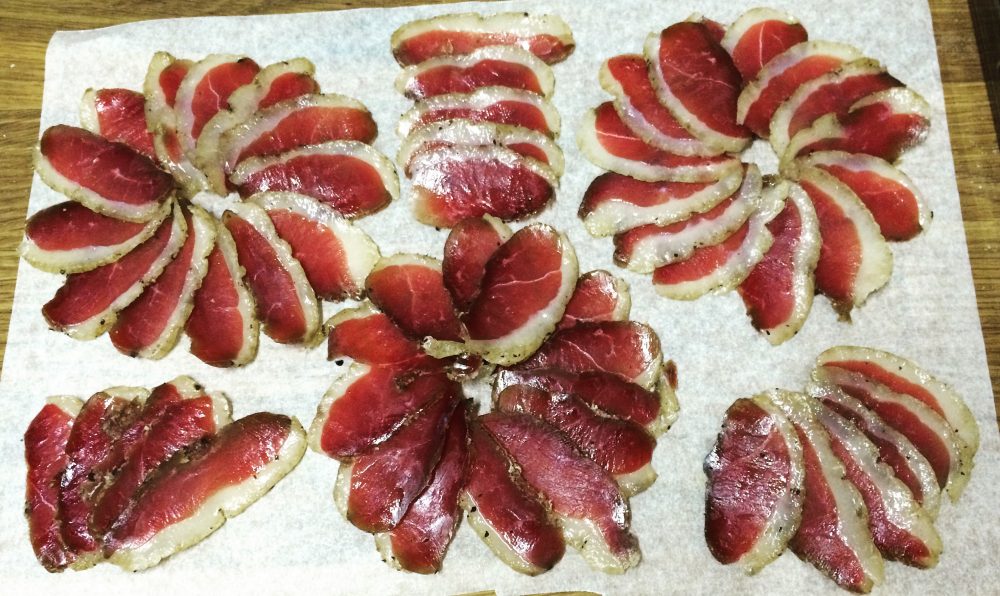
越南雞肝醬源自於法國雞肝醬,但卻沒有法國雞肝醬那麼濃味,比較清淡,但帶亞洲風味,主要也是用來搽在越式三文治 (Bahn Mi) 來吃的。

Vietnamese Chicken liver pate is a twist of French chicken liver pate, it’s not using herbs to make pate, it’s using vietnamese fish sauce and chinese spices, so the flavour is lighter with chinese taste.

作者今次所做的方法,是結合了兩者的做法,找出一個中傭的質感及味道。用了低溫慢煮的方法,可以保存耐久一點。以越南的做法,一星期內要吃完吧。

I just mix and match both making method for my version, try to find a moderate flavour and texture in between them.  I’m using sous vide method, that can pasteurized it to keep it a bit longer, otherwise, it can keep for a week only.

材料 (Ingredients) :

雞肝 (Chicken livers) – 500g

洋蔥 (onion) – 1個 (1 whole)

紅蔥頭 (shallots) – 3個 (3 pcs)

蒜頭 (garlic) – 1瓣 (1 glove)

牛油 (butter) – 30g

豬油 (pork lard) – 10g

鹽 (salt) – 5g

白胡椒粉 (white pepper) – 2g

魚露 (fish sauce) – 3g

五香粉 (five spices) – 2g

忌廉/煮食用忌廉/牛奶 (cooking cream/heavy cream/milk) – 20ml

蛋 (egg) – 1隻 (1 pc)

白蘭地 (brandy) – 20ml

做法 (Method) :

1. 預熱慢煮器至68°C

Preheat sous vide cooker to 68°C

2. 清洗雞肝,如有雞心,請清除,再清除一些雞筋及心管,印乾後,備用

Wash and clean the liver, take out the heart and vein, pat dry and set aside
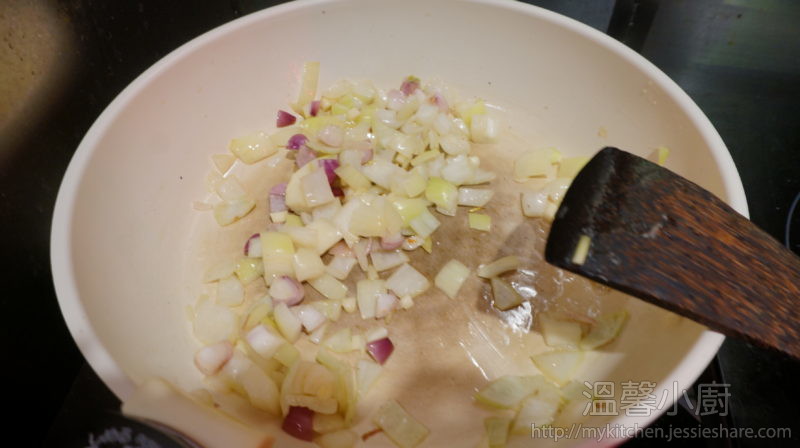
3. 洋蔥、紅蔥頭及蒜頭切粒

Cut the onion, shallots and garlic into small cubes

4. 準備一個平底鍋,下豬油,當鍋小許熱時,加入洋蔥粒、紅蔥頭及蒜頭,炒至軟身

Use a sauce pan, add some pork lard, melt it, then add onion, shallots and garlic, stir fry until soften

5. 加入雞肝,再炒至雞肝變色後,加入白蘭地酒,伴勻後,讓酒精揮發一下

Put in the chicken liver, stir fry until the liver change colour, then add some brandy, mix it well and let the alcohol evaporate
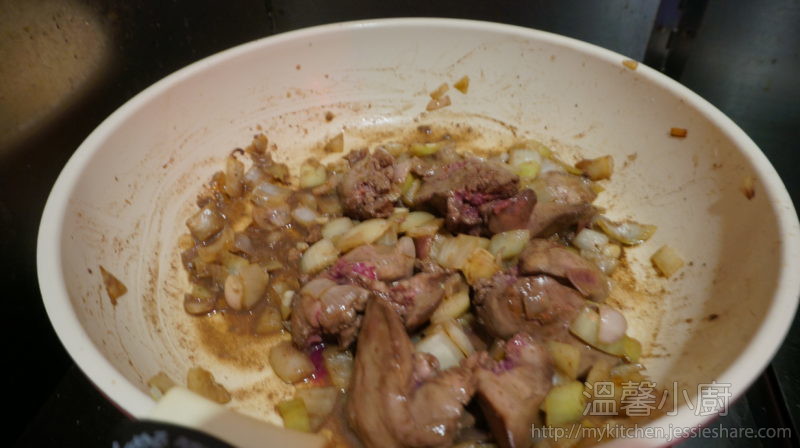
6. 下調味料,伴勻後就可以關火

Add all the seasonings, mix it well and heat off

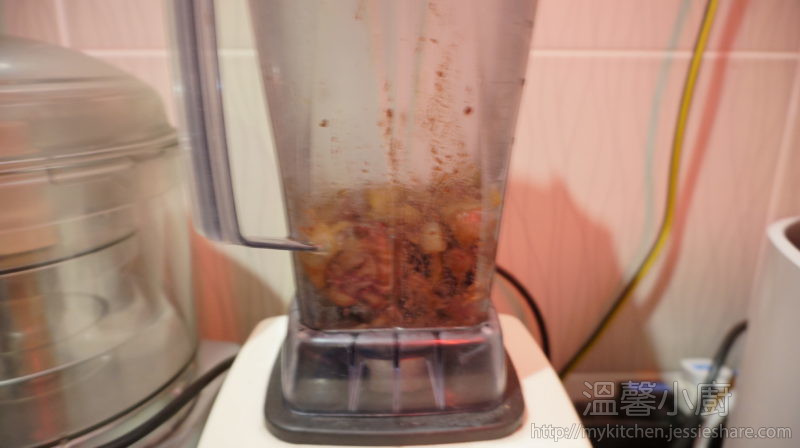
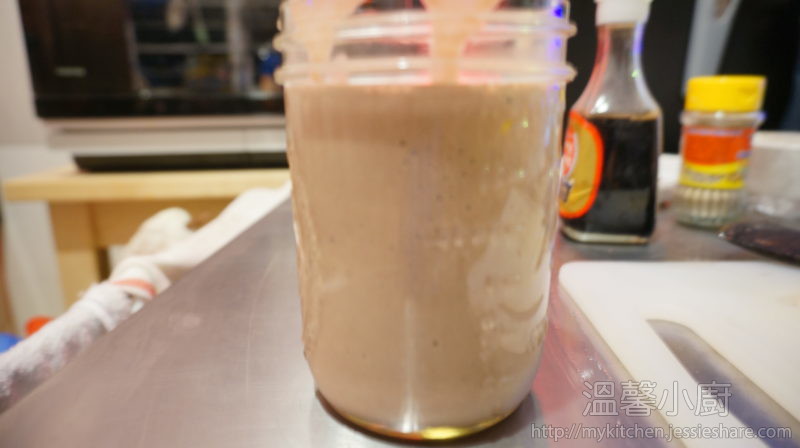
7. 把所有材料倒入攪伴器,先用細速攪伴,慢慢地加入忌廉/煮食用忌廉/牛奶,加入一半牛油,再加入蛋後才轉高速攪伴成幼滑就可以了,

Put all the ingredients into the blender, use low rate blending, then add milk/heavy cream/cooking cream slowly,followed by half of melted butter, then add egg, and change to high blending rate blend it until smooth like mousse form.

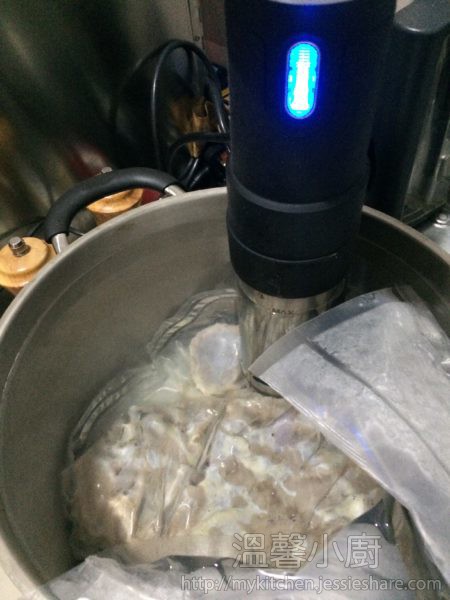
8. 把攪伴好的雞肝糊倒入密封式玻璃瓶內,把剩下的溶牛油,小心地倒在上面,上蓋時不要完全扭緊,留一點點以讓空氣可釋放

Pour the mousse into a glass jar, then pour the remaining melted butter on the top and close the lid with little bit loose to let the air bubble escape while cooking
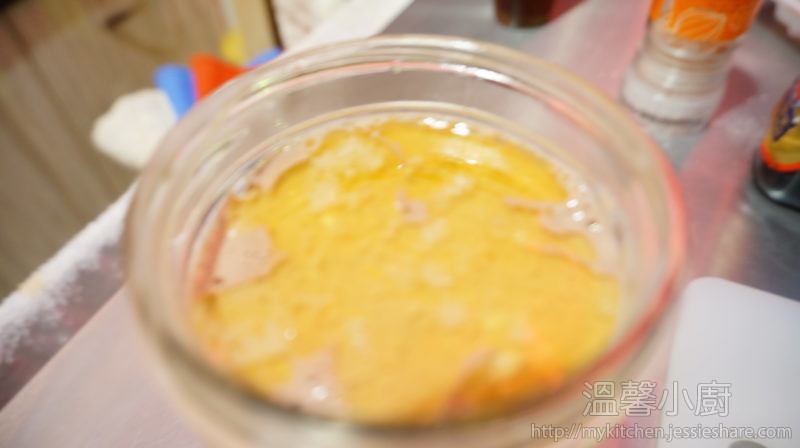
9. 放入慢煮器內煮2小時

Put the jar into sous vide cooker and cook it for 2 hours

10. 取出後立即放入冰水浸3小時就完成, 最後放入雪櫃一晚就可以享用了

After cooked, chilled for iced water bath for 3 hour and finished, then put into fridge for a night and enjoy.

[wpedon id=”1981″ align=”left”]

Posted in 煙燻器 (Smoker), 煙燻機 (Food Smoker), 煮食用具 (Cooker), 牛肉 (Beef), 磨粉機 (Grinder), 肉類 (Meat), 醃製及煙燻 (Curing and Smoking), 食物處理工具 (Food Processing Equipments), 切肉機 (Meat Slicer), 工具及廚具 (Utensils and Kitchen Equipments), 手工加工肉 (Charcuteries), 抽真空機 (Vacuum Sealer), 低溫慢煮機 (Sous Vide cooker)

自製醃肉及煙燻篇 - 煙燻牛肉 [低溫慢煮方法] (HOMEMADE CURING AND SMOKING – Pastrami [Sous Vide version])


作者來到馬來西亞後,一直想找大型牛腩來做煙燻牛肉,最近終於找到了。 上次作者用的方法,應該不太適合香港的環境做,所以今次用了一個新方法,這個方法不僅味道比較好,而且用質也比較鬆軟,吃起來好吃很多吧。


Finally, I found a large beef brisket in Malaysia.  This is I’m using another way to make and find that this more favourable and meat texture is softer, so here’s the recipe to share with you.


第一部份分:鹽水浸 ~用來給予味道及初步殺菌 (Part 1 – Brine)


材料 (Ingredients) :


大型牛腩 (Beef Brisket) – 2kg

鹽 (Salt) – 190g

黃糖 (Brown Sugar) – 330g

黑胡椒粒 (Black Peppercorn) – 40g

肉桂 (Cinnamon) – 2條

茴香籽 (Fennel Seed) – 2g

芫茜籽 (Coriander Seed) – 2g

八角 (Star Anise) – 1 whole

丁香 (Clove) – 5pcs

月桂葉 (Bay Leaf) – 2pcs

蒜粉 (Garlic Powder) – 5g

辣椒粉 (Chilli Flake) – 4g

芥末籽 (Mustard Seed) – 5g

水 (Water) – 4.5kg

Instant Cure #1 (Optional) – 10g


1. 準備一個大箱,把所有醃料放入箱肉,攪拌至所有糖及鹽溶於水中 (想容易溶的話,可以先用少量熱水溶解,再立即加入冰粒及水至室溫)
Prepare a big container, add all the spices and water into the water and mix it until all salt and sugar completely dissolved (If you wanna dissolve it easily, just use a small amount of hot water to mix it and put amount of ice to cool down until room temperature immediately)


2. 大型手腩開封後,先清新一下,然後用乾布或廚房紙印乾
Wash the brisket a bit and use a dry towel or kitchen paper to dry the meat


3. 小心地把牛腩上的脂肪及薄膜用利刀割出來,盡量清除所有的
Carefully trim off all the fats using a sharp knife


4. 清除好後,把牛腩放入箱內,放入雪櫃,保持於4°C儲存7天,每天從雪櫃取出一次並把牛腩反轉一下
Put the brisket into the brine for 7 days, refrigerate it and keep it on 4°C for your refrigerator, turn over once a day


5. 7天後,再準備另一個大型容器,放入大量冰及水,從雪櫃取出後,先清洗一下,再立即放入冰水中浸泡一小時
After 7 days, wash off all the spices under tap water, prepare another container, put large amount of ice and water, soak the brisket for another one hour

第二部分 – 低溫慢煮 (Part 2 – Sous vide)


1. 預備低溫慢煮器,預熱為60°C
Preheat your sous vide cooker to 60°C


2. 浸泡好的牛腩,取出並印乾
Take out the brisket and dry it using dry towel or kitchen paper


3. 放入真空袋進行真空,並開始低溫慢煮,時間為48小時
Put the brisket into vacuum bag and progress sous vide for 48 hours


第三部分- 調味 (Part 3 – Dry Rub)


材料 (Ingredients) :


鹽 (Salt) – 75g

黃糖 (Brown Sugar) – 375g

黑胡椒粒 (Black Peppercorn) – 72g

芫茜籽 (Coriander Seed) – 55g

蒜粉 (Garlic Powder) – 10g

洋蔥粉 (Onion powder) – 10g

甜椒粉 (Paprika) – 5g

芥末粉 (Ground Mustard) – 5g


1. 準備一個大容器,加入水及冰,把低溫慢煮好後的牛腩,立即連袋放入冰水中冷卻
Prepare a container with ice and water, put the cooked brisket into a ice water


2. 然後把以上的所有材料用打粉機打勻,備用
Mix all the dry rub spices well


3. 取出冷卻好的牛腩,用乾布或廚房紙印乾,要印得很乾
Again, take out the bisket and dry it thoroughly this time


4. 把攪拌好的乾調味料用手拍在牛腩上,並用力把調味料壓好,一定要平均地舖滿整件牛腩上
Apply the dry rub on the bisket, press the dry rub onto the bisket and make sure it is completely covered all over the meat

第四部分 – 煙燻 (Part 4 – Smoking)


1. 準備好煙燻器,作者覺得用胡桃木比較適合,今次用3湯匙的木碎
Prepare the smoker, I’m using Hickory wood chips, this time using 3 tablespoons of wood chips


2. 把調味好的牛腩放入煙燻器進行煙燻一小時,溫度保持於100°C-107°C,而通風口保持全開
Progress of smoke for one hour, make sure it keeping 100°C-107°C and keeping the vent fully open


3. 最後煙燻好的牛腩放在架上放涼及放水氣,就可以切片及保存。
After smoked, put it in the rack and let it cool down and evaporate water, then you can slice it and refrigerate it, finished.


[wpedon id=”1981″ align=”left”]

Posted in 薄餅爐 (Pizza oven), 工具及廚具 (Utensils and Kitchen Equipments)

意大利薄餅火爐 (Italian Wood fired pizza oven)


作者近來比較少煮其他特別的菜式,因為大多數時間在研究新的工具 – 意大利薄餅火爐。 讀者們都知道,作者很喜歡煮意大利🇮🇹菜式,而意大利🇮🇹菜式中最經典莫過於薄餅吧,所以作者一直渴望擁有一個意大利薄餅爐;在香港的生活,有一個有瓦遮頭的地方,作者已經是幸運了,當然擁有薄餅爐只是高不可攀的夢想吧。

Recently, I have less time for cooking in the kitchen, because I have to try my new toy – Wood Fired pizza oven.  As you all know when you followed my page, I really really fanatic in Italian cuisine, however, one of the most authentic food of Italian cuisine is PIZZA.  Therefore, I wanna to have a pizza oven since I’m in Hong Kong, but there’s an unattainable dream in my life if I’m in Hong Kong, I’m already lucky enough that still have a little living area to live with.


雖然作者在怡保的家在馬來西亞來說不算得是大屋,只是一般小型家庭面積的排屋,但也有一個少少的後園空間,一般馬來西亞華人會改建成為濕廚房用作煮食用,但作者只是租住,所以作者用作戶外煮食的地方,終於把遙不可及的夢想實現了。

After moved to Malaysia, although my house is not a big one, it’s only a small size of attached house, but still have one tiny back garden; for local family, they will extend this area as wet kitchen for cooking purpose; however, I’m just rent this house, so I planned to use it as outdoor kitchen, and finally my dream comes true now.


作者在這篇文章中就介紹一下什麼是薄餅火爐,以及其原理,給各位讀者了解一下。只可惜大部份讀者只可以了解而不能擁有,因為這火爐只可以用於室外的。

Thus, I wanna briefly talk about basic knowledge of wood fired pizza oven to let you know about it.  I understand that, most of the readers here who are in Hong Kong cannot have this oven, because it’s only can be used outdoor.


首先,傳統薄餅爐用耐高溫磚以圓拱形狀做成,這可以令到火焰從燒木頭一邊以拱形伸延到火爐的另一端,以及保持爐內的溫度,不容易降溫。一般傳統的薄餅火爐最高可達500度高溫,而烤製薄餅最理想的溫度則以300度-350度,60秒至1分鐘為最佳。

First, traditional wood fired pizza oven built by bricks in dome shape, this dome shape can let the fire extend from wood fired side to another easily and also can maintain heat longer.  Wood fired oven can be reached maximum temperature to 500 degree celsius.  The best ideal pizza should be cooked in 300-350 degree celsius for about 60 seconds to 1 minute only.


薄餅爐所用的木頭隨個人喜好及地方有所不同,在外國大多數用橡木,而作者在馬來西亞最容易找到就是橡膠木,有些地方還可以找到紅木吧。 現代有很多薄餅爐已經用燃氣的,雖然一樣可以高溫做出理想的薄餅,但是卻沒有了木頭燒出來的那份香味,並因為用氣體直接烤薄餅,反而有著一股氣體的臭味吧。 香港也有不少用燃氣式的薄餅爐的薄餅店,那是因為食環署已經沒有發出了火爐牌照,所以只可用燃氣式的吧。

Wood fired oven using wood chunks as fire media, but wood kind depends on personal and place preferences.  In most of western countries, they would like to use oak wood, but me, in Malaysia, using rubber tree wood, and some can find red wood as well.  However, pizza oven also using gas as fire media nowadays, although it’s still can cook the same result as wood fired one, but there’s no wood fragrance smell and may be have some gas smell too.  In Hong Kong, all those using pizza oven to cook pizza, they can only use gas one because there’s no more wood fired licence nowadays.


作者所擁有的只是小型的攜帶式意大利薄餅爐,但功能與傳統大型薄餅爐一樣,只是不能一次做好幾個薄餅而已。

Although I’m using a mobile wood fired oven, the function still the same as traditional one, but can make one at a time only.


薄餅爐除了可以做薄餅外,也是一個傳統烤焗爐及燒烤爐;所以作者也用它來做其他不同的菜式,以下附上一些菜式圖片。

Wood fired pizza oven, not only for cooking pizza, it also a traditional oven and bbq oven as well.  So, I use it for cooking other food as shown some pictures below :


[wpedon id=”1981″ align=”left”]

Posted in 鴨肉 (Duck), 意大利菜 (Italian Cuisine), 抽真空機 (Vacuum Sealer), 低溫慢煮機 (Sous Vide cooker)

意大利檸檬酒煮鴨胸 – 低溫慢煮版 (Sous Vide Duck Breast with Limonocello and butter)


情人節的時候,作者煮了這個菜式後,愛人很喜歡,今天愛人要求再食,所以作者有機會為大家分享這個食譜吧。這菜式的材料及做法很簡單,大家可以在元宵節同您的愛人一起慶祝吧。


材料 (Ingredients) :


鴨胸 (Duck Breasts ) – 2件 (2 pcs)


檸檬 (Lemon) – 半個 (half)


牛油 (Butter) – 適量 (


意大利檸檬酒 (Limoncello) – 50ml


做法 (Method) :


1. 預熱慢煮棒至攝氏58度
Preheat your sous vide circulator at 58 Degree Celsius


2. 鴨胸先灑上鹽及黑胡椒
Marinate duck breast with salt and black pepper


3. 準備一個平底鍋,不用下油,用中火先空燒一下,把鴨胸 (皮向下)放入平底鍋煎至金黃色,再煎四週,盛起備用
Prepare a sauce pan without oil, heat the pan in medium heat, put the duck breast (skin down) and sear the skin until golden brown, the sear all over the duck breast, set aside


4. 用刨肉器小心地刨出幾條長檸檬皮
Peel some ringlets of lemon


5. 準備一個小碗,把檸檬汁及意大利檸檬酒攪勻並試味
Prepare a small bowl, squeeze lemon juice and mix with limoncello, taste it and set aside


6. 準備真空袋,把檸檬皮放在鴨胸上,放入真空袋並把調好的檸檬汁倒入袋內,然後進行真空
Put duck breast, ringlets and the lemon sauce into the bag and vacuum it.


7. 放入慢煮鍋進行慢煮2小時30分
Progress of sous vide for 2 hours 30 minutes


8. 煮好鴨胸後,先把醬汁倒出
After duck breast is cooked, pour out the sauce first


9. 準備一個小鍋,把牛油用慢火煮溶,同時間把剩餘的檸檬皮刨成蓉
Prepare a small pot, melt the butter in small heat, meanwhile, peel the rest of the lemon peel into zest


10. 把醬汁倒入小鍋內並把檸檬皮放入,煮至醬汁濃厚
Put the sauce and lemon zest into the small pot, cook until thicken or reduced in half


11. 把鴨胸再次用煎鍋煎至脆皮
Prepare a sauce pan again and seal the skin until crispy


11. 鴨胸切成片,把醬汁倒在面就完成。
Pour the cooked sauce over the duck breast and finished.


溫馨提示 : 1. 如想整件鴨胸上碟,可在鴨皮上𠝹上十字紋, 2. 煎皮後的鴨油,可以用來煎焗紅蘿蔔及薯角作伴菜


Tips : 1. If you wanna serve your duck breast in whole, you can cut the skin in square form, 2. After sear the duck breast, the excessed oil can be used to cook carrots and potato as side dish.


[wpedon id=”1981″ align=”left”]

Posted in 蔬菜 (Vegetable), 中菜 (Chinese Cuisine), 湯底 (Stock), 低溫慢煮機 (Sous Vide cooker)

[原創食譜 (Original Recipe)」蝦籽柚皮 – 低溫慢煮版 (Braised Pomelo Skin in Shrimp Roes – Sous Vide version)


各位,中秋節快樂啊! 作者剛剛才可以暫時安定下來,但還有很多濕碎事未解決,已經急不及代想分享新食譜了。 但由於未太適應新地方關係,對不起,這次的相片沒有太仔細地影下來,請大家原諒,要辛苦大家多看文字了。 下次有機會再做,一定會加插回遺留了的相片。

Happy Mid-Autumn Fest.! I just moved to Malaysia and just moving in a new house, although still have many little matters not yet solve, but wanna share this recipe for you.  Also, since this is a new place, sorry that I have missed some photos for this recipe, I will add in later when I will make it next time.


蝦籽柚皮這個古老菜式,相信很多人也吃過,也知道當中很多功夫吧。 今次作者用舊酒新瓶的方法,用低溫慢煮棒來煮,希望更容易入味及容易做到入口即化的效果。

This a a very old traditional Cantonese dish, so the procedure is very complicated and really take times to do it, but I’m using sous vide method to braising it to make it more tasty and hope to make the same texture as old method.


很多大廚說一定要用沙田柚來做,而馬來西亞的籮柚更加不適合做,因為柚皮太薄,但作者現在住在馬來西亞,當然只會用怡保籮柚吧,讀者可以買來沙田柚來做的。

Although many chefs said that not using Malaysia’s Pomelo, because it is not thick enough, but since I’m in Malaysia right now, so I’m still using it, you can still using Chinese pomelo to do it.


先說前期準備功夫  (Preparation of pomelo skin):


1. 柚皮先切去綠色的外皮

Peel off the most outer skin first


2. 用滾水先汆水十分鐘後,立即放在冰水中浸泡

Put the pomelo skin into a boiling water and let it cook for 10 minutes, then soak in a iced water


3. 然後每3個小時啤水一次及換新水,重復做3天,把柚皮的苦澀味除去

Then squeeze out all the water carefully and replace a new water bath every 3 hours, repeat this step for 3 days to get rid of bitter taste.


然後煮上湯 (Cook the stock) :

材料 (Ingredients):


雞殼 (Chicken bone) – 1個 (1 whole)


金華火腿 (Chinese salted ham) – 4片 (4 slices)


大地魚/柴魚 (Dried earth fish) – 1條 (1 whole)


瑤柱 (Dried scallops) – 3粒 (3 pcs)


冬菇 (Dried mushroom) – 3個 (3 pcs)


蝦乾 (Dried shrimp) – 4隻 (4 pcs)


做法 (Method) :


1. 金華火腿先汆水,備用

Put the dried ham into a boiling water and cook for 2 minutes, set aside


2. 瑤柱、冬菇及蝦乾用水浸泡,備用

Dried scallops, dried mushrooms and dried shrimps soak into a water until soft, set aside


3. 大地魚/柴魚先用小火慢慢地燒至出香味,備用

Put the dried earth fish in a very small fire and grill it until smell fragrance.


4. 準備一個大鍋,先煲一鍋水,水滾後把所有材料放入煲內,浸泡瑤柱、冬菇及蝦乾的水也一並倒入

Prepare a big pot, boil water and put all the ingredients when water is boiled, also pour in all the soaked water with dried food


5. 慢火煮2小時後,先取出材料,只留下上湯

Let it cook for 2 hours in a small fire, then take all the ingredients out first


6. 預熱慢煮棒,60度,16小時

Preheat your sous vide machine in 60 degree Celsius, and will cook for 16 hours


7. 再把柚皮作最後一次啤水,然後把乾水好的柚皮放入湯鍋內,讓柚皮吸收上湯大約10分鐘

Do the last squeeze of pomelo skin, put all the pomelo skin into the stock, and let it absorb the stock for 10 minutes


8. 小心地把帶有上湯的柚皮放入真空袋內,再加入少許上湯,就可以進行低溫慢煮

Put the absorbed pomelo skin into vacuum bag gently, and add a little bit extra stock on it, then start cooking


9. 慢煮好後,小心地倒出來

After fished cooking, pour out all carefully


10. 蝦籽用平底鍋不加油乾鍋炒至出香味,備用

Use a sauce pan in a small fire, toast the shrimp roes until smell fragrance


11. 把剩餘的上湯煮滾後,加入蠔油及生抽,然後少量地加入生粉水,煮成一個濃汁,再淋在柚皮上

Boil the excess stock, add some oyster sauce and soy sauce, then add the potato starch water little by little until cook in a thick sauce, then pour at the top of the pomelo skins


12. 最後把蝦籽灑在上面就完成了。

Finally Sprinkle on the toasted shrimp roes and finished.


[wpedon id=”1981″ align=”left”]