Posted in 蔬菜 (Vegetable), 其他西餐 (Other Western cuisine), 湯類 (Soup)

俄羅斯羅宋湯 (Russian Borscht)


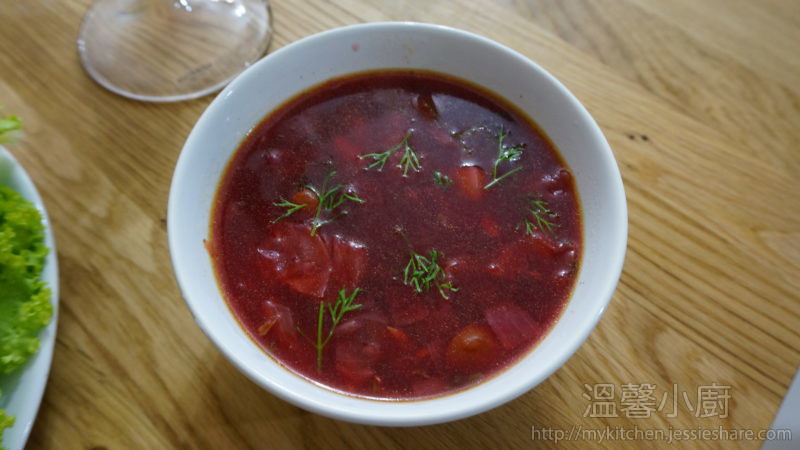
我估讀者會問,羅宋湯?有乜特別?作者為何會介紹? 不是我們平時在餐廳所喝的羅宋湯嗎? 好的。。。作者在這裏回答你們吧。

I think readers will ask, why Borscht? what’s the special about it? We are always having Borscht in restaurant, what’s wrong with it? so..I’m answering you here.


我們在餐廳所喝到的羅宋湯,除了蔬菜外,湯底其實是加蕃茄醬 (Ketchup) 加水而煮成的,有些好的餐廳會也會用上牛湯底,但也是加茄醬而已,所以我們在香港所認識的羅宋湯其實不是那回事。

Although we always enjoy Borscht in restaurant, except the veggies, what we have enjoyed in restaurant is only Ketchup and water as the stock base, but some restaurant will use beef stock base and also added with ketchup on it, actually the traditional Russian Borscht is not the same.


真正的羅宋湯是由俄羅斯傳到世界各地,但傳到亞洲,卻因為缺乏了羅宋湯內最主要的材料 – 紅菜頭,所以當時有餐廳把它轉一下,沒有紅菜頭,就加入大量番茄醬,把湯變為橙紅色,直到現在,很多餐廳也原用這個方法。

The Traditional Borscht from Russian or Ukrainian and spread around the world, unfortunately, when it’s spread to Asia, it’s because lack of beetroot at that time, so Chinese chef twisted the recipe, using Ketchup instead of beetroot to form the red colour, so you normally can see the Borscht not in red colour, it’s in orange red colour instead, and now still using Ketchup in Asia for their recipe.


真正的羅宋湯是鮮紅色的,那鮮紅色來自紅菜頭,湯底一般用牛肉湯底,但現在有些也用雞湯底的。 但作者的版本,兩者也用,這令到湯味的層次更加豐富。

So, the traditional Borscht in red colour comes from beetroot, normally using beef stock, but some are using chicken stock now, and my version is combination stock, use both the get more flavour on it.
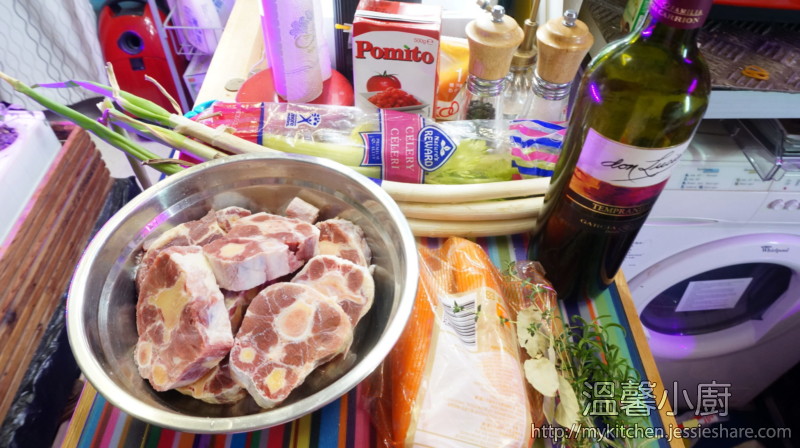
 

材料 (Ingredients):


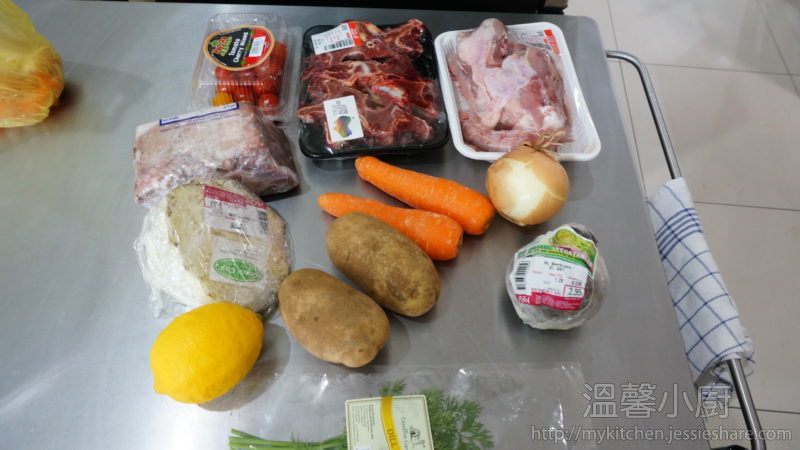
紅菜頭 (Beetroot) – 1個 (1 whole)

紅蘿蔔 (Carrots) – 2個 (2 pcs)

洋蔥 (Onion)  – 2個 (2 pcs)

椰菜 (White cabbage)  – 半個 (half)

蕃茄 (tomato) – 2個 (2 large)

薯仔 (potato)  – 2個 (2 large)

牛骨 (beef bone) – 半磅 (1/2 lbs)

雞殻 (chicken carcass) – 1個 (1 whole)

牛肉 (beef chunks) – 幾粒 (few)

牛油 (Butter) – 1湯匙 (1 tablespoon)

蒜頭 (Garlic) – 1瓣 (1 pc)

香葉 (bay leaves) – 3片 (3 pcs)

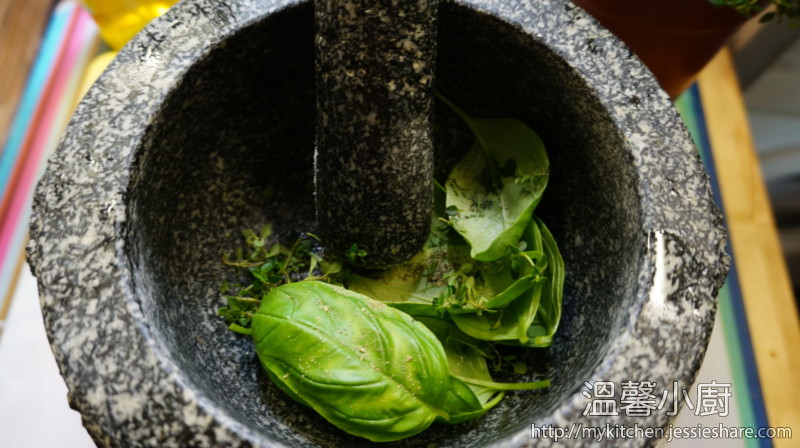
香料 (spices) – 隨自己喜愛 (personal preferences) – i.e. dill, parsley

鹽 (salt) – 適量 (few)

黑胡椒 (black pepper) – 適量 (few)

檸檬 (Lemon) – 半個 (half)


做法 (Method) :


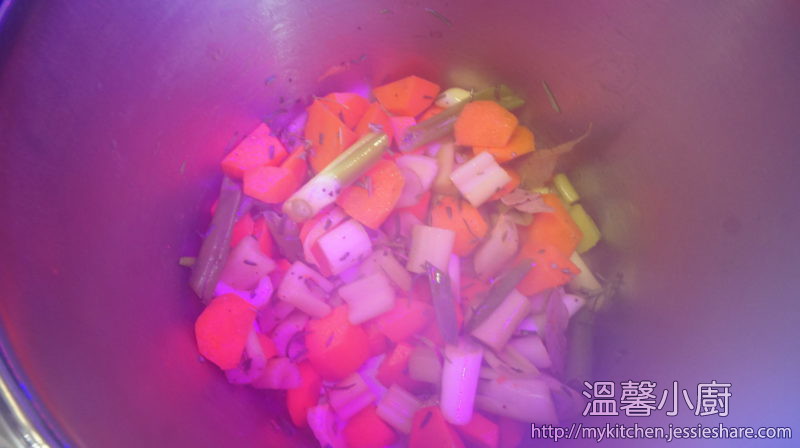
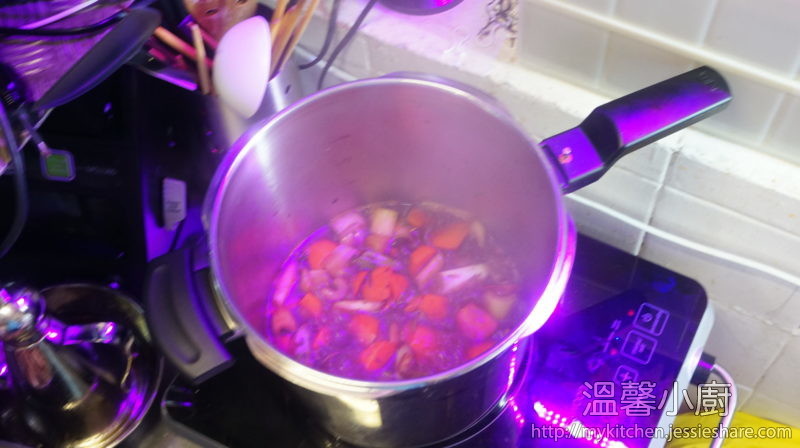
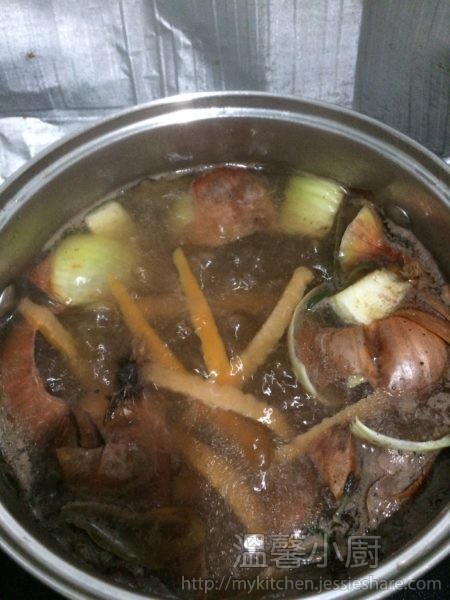
1. 先煮湯底 : 準備一個湯鍋,把牛骨、雞殼、洋蔥1個、紅蘿蔔1條、西芹及水,放入鍋內,大火煮滾後,轉小火煮1小時 (今次作者效法了零廚餘餐廳的做法,只用蔬菜的廚餘來煮湯底)
Cook the stock first : prepare a stock pot, put beef bones, chicken carcass, onion, carrots and celery into the pot, covered it with water, boiled it and then turn to small fire, cook it for 1 hour (this time, I just tried to use all veggies waste to cook my stock that referred to zero waste restaurant)
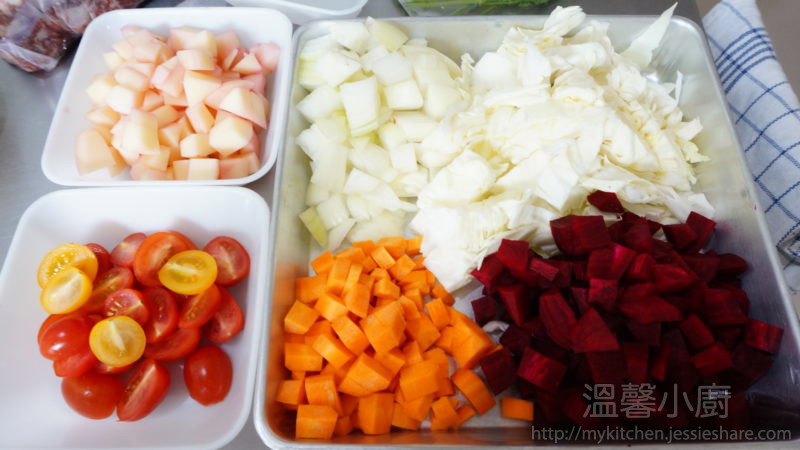
 

2. 把所有蔬菜切成小粒或絲狀
Cut all the veggies into small cubes and/or slice it into thin slices


3. 準備另一個鍋,加入油,先加入洋蔥及蒜頭,炒至軟身後,再加入紅蘿蔔及薯仔再炒,再加入紅菜頭、番茄及椰菜, 加入少量水及檸檬汁炒勻,慢火煮十分鐘
Prepare another pot, add oil, put the onion and garlic in, stir it until soft, then add carrot and potato, stir well; add beetroots, tomato and cabbage, stir again, add some water and lemon juice on it and cook in small heat for 10 minutes.
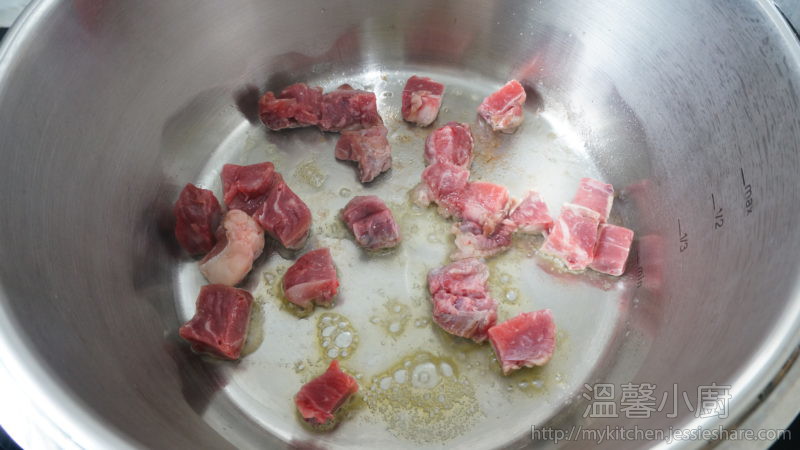
 

4. 另外用牛油把牛肉粒煎香
Prepare a sauce pan, heat up the butter, then add beef cubes and sear it.


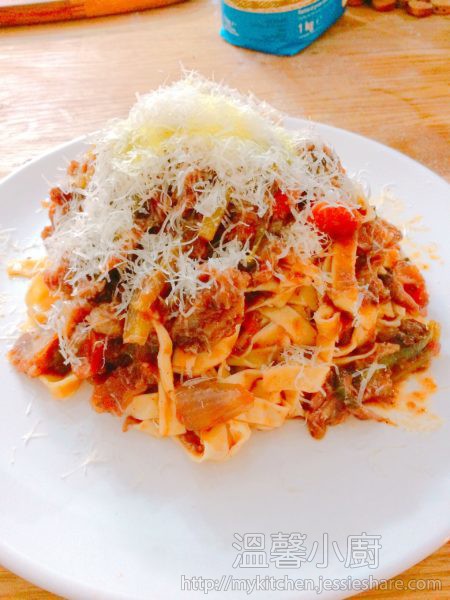
5. 然後把煮好的湯底用隔篩過慮出湯汁在剛炒好的菜鍋內,再加入牛肉粒,煮滾後,轉小火再煮多45分鐘,煮好後加入檸檬汁就完成。
Use a sieve to shift the stock the veggies pot, then add beef cubes, boil it and turn to small fire, cook for another 45 minutes, then add some lemon juice and finished


溫馨提示 :有些人喜歡在湯上加入酸忌廉,隨個人喜歡吧。

Tips :  Some people love to put sour cream on, it’s personal preferences.


[wpedon id=”1981″ align=”left”]

Posted in 其他西餐 (Other Western cuisine), 強力及高速攪拌器 (High Speed/Powerful Blender), 抽真空機 (Vacuum Sealer), 低溫慢煮機 (Sous Vide cooker)

低溫慢煮豬仔脾配蘋果醬汁 (Apple-Braised Pork Shank – Sous vide method)


本以為這個寫好了的食譜不能出版,因為作者從馬來西亞回來後,在島內的超市沒有了豬仔脾,幸好前兩天返貨,這個食譜才得以出版。作者不清楚馬來西亞有沒有這種食材,所以本打算在離港前再看看,沒有這食材的話,就刪除這個食譜。

This recipe I have written before travel to Malaysia, however, when I back to Hong Kong, I can’t find any stock at supermarket in the island, I’m so disappointed, I wanna delete this recipe too.  Luckily, it have been restocked again these 2 days, so I can, finally, publish this recipe now.


最近作者所住的島內唯一超市發現新產品 – 豬仔脾,價錢又平,作者興奮到不得已,買回來後,用低溫慢煮做了一道菜式,簡單地配上薯蓉及烤西蘭花,已經係一道高級菜式了。在這篇中,作者只分享豬仔脾及醬汁的做法,其他簡單的配菜,我想不用再分享了。

Recently, I’m really happy that I’ve found a new product in the supermarket that I’m living, so I bought it back and cooked it using sous vide, served it with mashed potato and roasted broccoli.  Here, in this recipe, I will just only share the pork shank and sauce cooking.


我們做這個醬汁,需要大量蘋果汁,但作者不建議買來現成的,因為加工過,有其他化學物質,那麼是很不健康的,所以我們先來做個蘋果汁,讀者可以用慢磨機,這比較方便,如果用攪拌機,就得好像作者一樣,先過濾果渣,我們只需要蘋果汁。

For the apple sauce, we need apple juice, but I’m not recommend you to buy packed one since it is so many substitutes, better make fresh apple juice by your own.  If you have  juicer machine, it’s more convenient, because we just need the juice only; but if only have a blender, please use sieve to sift the juice out.


材料  (Ingredients):


豬仔脾 (Pork Shank) – 4隻


蒜頭 (Garlic)  – 4瓣


蘋果汁 (Apple Juice) – 400ml


蘋果醋 /紅酒醋/白酒醋 (Apple cider vinegar/Red Wine vinegar/White) – 200ml


芥末醬 (Dijon Mustard) – 150g


原糖 (Cane sugar) – 100g


鹽 (salt)


油 (Oil)


黑胡椒 (Black pepper)


新鮮百里香 (Fresh Thyme) – 8支 (無新鮮可用乾的 – If you don’t have fresh, dried one also OK)


做法 (Method) :


1. 預熱慢煮器到70度
Preheat your sous vide cooker to 70 degree Celsius


2. 豬仔脾先用鹽及黑胡椒調味
Seasoning pork shank with salt and pepper


3. 準備平底鍋,開大火,下油,把豬仔脾煎四邊至金黃色,盛起,備用
Prepare a sauce pan, add some oil, and sear the pork shanks until brown, then remove it and set aside


4. 先把蘋果打成蘋果汁
Blend your apple into apple juice


5. 把蘋果蓉隔開,只用蘋果汁 (如果讀者用慢磨榨汁機,這步驟就可以省卻)
Use a sieve to sift out the apple pulp, remain the apple juice only (If you are using pure juicer, you can skip this step)


6. 同一個鍋,加入蒜頭、蘋果醋、芥末醬及糖,用中火煮至醬汁收成杰醬,放涼一會
Use the same pan, add garlic, apple juice, apple cider vinegar, Dijon mustard and cane sugar and cook it under medium fire until becomes a thick sauce even glaze.  Let it cool down a bit


7. 準備真空袋,把豬仔脾,醬汁及百里香放入袋內並進行真空封密,然後放入慢煮器,進入24小時慢煮
Prepare a sous vide bag, put in pork shanks, sauce and thyme (If you are using dried one, better seasoning it first before put into the bag), then let it start cooking for 24 hours


8. 翌日取出後,準備小鍋,先倒出醬汁,把醬汁用中火再煮回杰醬
Next day, prepare a small pot, pour out the sauce after cooked, then cook the sauce again until thicken


9. 豬仔脾上碟後,把醬汁淋上就完成。
Served the pork shank and glaze the thick sauce in, finished.


食譜來源 : https://www.chefsteps.com/activities/hearty-apple-braised-pork-shank


溫馨小貼士 : 這個醬汁,亦可作為燒烤醬,作者試過用來烤豬肋骨,相比用BBQ醬無咁膩,酸酸甜甜好胃很多。
Tips : This sauce also can be replaced as BBQ sauce, it’s more healthy and more delicious.


[wpedon id=”1981″ align=”left”]

Posted in 煙燻機 (Food Smoker), 肉類 (Meat), 醃製及煙燻 (Curing and Smoking), 醬汁 (Sauce), 豬肉 (Pork), 其他西餐 (Other Western cuisine)

[原創食譜 Original Recipe] 煙燻豬肋骨配自家製燒烤醬 (Smoked Ribs with Homemade BBQ Sauce)

IMG_7128


之前說過自家製的煙肉及煙燻牛肉,作者大約每隔一段時間就會做一批,所以煙燻爐也算是比較多用,相信一般家庭沒有像作者一樣吧。平時也可以用煙燻爐做出很多美食,不要由它放著啊,因此,作者今次介紹這個大家也很喜愛的食物,可以在週末或假期食得開心,而自家做卻比餐廳便宜得多吧。 作者建議買丹麥入口那款,雖然沒有美國那麼多肉及大件,但每人一排的份量是剛好,不會覺得膩,但又滿足口福。

I have talked about making bacon and pastrami at home before, however, I will make a batch for some certain time, so I use the stovetop smoker quite often, but I don’t think the readers here will do so, then it seems quite a waste for the great tool; therefore, I’m introduce this dish here that most people will love it, you can make it at home during weekends or holiday, it’s much less expensive compared to restaurants.  On the other hand, I prefer to buy ribs that imported from Danish, it’s not as meaty and large potion as US one, but it’s good for Asian that everyone have its own full rib, not so greasy, will feel full and enough delicious.


對不起,今次沒有做法的附圖,希望讀者也明白吧。

So sorry that I don’t have attached photos for how to make it, hope you will understand my wordings.


材料 (Ingredients):

豬肋骨 (Baby back ribs) – 2條 (2 full pcs)

蒜頭 (Garlic) – 4瓣 (4 cloves) <– 蒜蓉 (Minced)

茄汁 (Ketchup) – 4湯匙 (4 tablespoons)

豉油 (Soy Sauce) – 4湯匙 (4 tablespoons)

蜜糖 (Honey) – 4湯匙 (4 tablespoons)

蔗糖 (demerara sugar) – 60g

芥末粉 (Dried English Mustard) – 1茶匙

辣汁 (tabasco sauce) – 2茶匙

Jack Daniel’s 煙燻燒烤醬 (Jack Daniel’s Full Smoky Flavour BBQ Sauce) – 4湯匙 (4 tablespoons)


做法 (Method) :

1. 把所有調味材料放入小鍋,煮至醬汁至喜歡的稠度及試味,放涼待用
Prepare a small pan, pour all the sauce ingredients into the pan and cook until sticky, taste it.  Set aside and let it cool down

2. 把準備好的豬肋骨放上一個長盤,把煮好了的醬汁平均地塗在肉上,醃一個小時
Put the ribs into a long rack, glaze the sauce into the ribs and let it marinade for an hour

3. 準備好煙燻爐,把醃好的肉放入並進行煙燻一小時 (請保持在100度左右)
Prepare the stovetop smoker, let it smoke for one hour (maintain the temperature at around 100 degree celsius)

4. 在煙燻完成前,請準備好焗爐,預熱為200度
Before smoking complete, prepare the oven at 200 degree celsius

5. 待煙燻完成後,再次塗上醬汁,放入預熱好的焗爐焗20分鐘
After smoking completed, glaze the sauce again and transfer the ribs into oven and cook for 20 minutes

6. 焗好前最好再次把醬汁微微煮滾 (因為之前曾沾過生肉,所以安全為上而已)
Reboil the sauce again

7. 待焗好後再度塗上醬汁,待15分鐘後就完成。
Take out from oven, glaze the last sauce on the ribs and wait for 15 minutes and finished.


[wpedon id=”1981″ align=”left”]

Posted in 牛肉 (Beef), 肉類 (Meat), 其他西餐 (Other Western cuisine), 壓力煲/高速煲 (Pressure Cooker), 低溫慢煮機 (Sous Vide cooker)

紅酒燴牛尾 (Oxtail stew with red wine sauce) {傳統做法及低溫慢煮方法 (Both traditional and sous vide method)}

IMG_6904

小編相信很多讀者也煮過這道菜吧,現在有了壓力煲,煮它真的容易很多吧。
I think many people cooked this dish before, if you are using pressure cooker, it really save a lot of time.


材料 (INGREDIENTS):


牛尾 (Oxtail) – 1kg (小編在超市買2包急凍牛尾)

紅蘿蔔 (Carrots) – 2條 (2 pcs)

西芹 (Celery) – 2條 (2 sticks)

大蔥 (Leek) – 1條 (1 stick)

迷迭香 (Rosemary) – 2條 (2 sprigs)

麝香草 (Thyme) – 幾條 (few sprigs)

月桂葉 (Bay Leaves) – 4片 (4 pcs)

丁香 (Cloves) – 4粒 (4粒)

罐頭番茄 (Plum Tomato Tin) – 1罐 (1 tin)

紅酒 (Red Wine) – 275ml

牛肉湯[牛肉精粒+水] (Beef Stock)

喼汁 (Worcestershire sauce)

麵粉 (Flour)

鹽 (salt)

黑胡椒 (black pepper)

DSC01910

做法 (METHOD):


1. 預熱焗爐220度,把牛尾、橄欖油、鹽及黑胡椒撈勻,把牛尾放入焗爐焗20分鐘
Preheat oven to 220 degree, mix the oxtails with olive oil, salt and black pepper, then put to oven roasting it for 20 minutes


2. 把紅蘿蔔、西芹及大蔥切件
Trim celery and leek into pieces and cut the carrot in chunks


3.  準備壓力煲,加入油,開中細火,把以前切好的紅蘿蔔、西芹及大蔥炒香
Prepare pressure cooker, add oil, medium-low heat, stir fry all the vegetables


4. 加入迷迭香、麝香草及月桂葉再炒至香草出味,加入鹽、黑胡椒調味
Add rosemary, thyme and bay leaves and stir fry until smell good, then seasoning it.

DSC01913


5. 然後倒入罐頭番茄及紅酒
Pour tomato tin and red wine into the port and mix well

DSC01915

6. 加入牛尾連汁,跟著加入牛肉湯(牛肉精粒及水), 記住水量只需蓋過食物
Add the oxtail with juices and finally add beef stock or beef cube with water, just cover the food is enough


7. 煮好後及喼汁調味就完成了。如果讀者用壓力煲,可能水份比較多,那可加一些麵粉,然後攪拌至適合的濃度。隨個人喜愛是否去骨,小編沒有去骨,但剩餘的就去⻣,第二天配麵包吃也很美味啊
After finished, season it with Worcestershire sauce.  If you are using pressure cooker, it may be not slimmer enough, then you can add some flour and mix well until thicken.  You can take out the bone if you like, you can enjoy it with bread also tasty too.


{後加新做法 : 作者嘗試了用低溫慢煮方法,效果及味道比較好,大家可以先依照上述方法,炒好所有材料及焗好牛尾,最後把所有材料放入真空袋,低溫慢煮為82°C, 24小時,完成後倒入鍋內,小心地取出骨頭,把肉分拆,炒勻就可以了。
New method used : I have tried sous vide method recently, it’s more tasty and easy to handle.  You can still follow the above method, cooked oxtails and all the ingredients, then put it all in a vacuum bag and proceed in sous vide at 82°C for 24 hours.  Pour all the cooked sauce with oxtail into a sauce pan, then take out the bones and tear off the meats, then stir well and serve.}


p.s. 用疇鐵鍋需要放在焗爐170度5小時,用壓力煲就需時1.5小時 If you are using cast iron pot, preheat your oven for 170 degrees and cook for 5 hours, but if you using pressure cooker, just cook it for 1.5 hours


[wpedon id=”1981″ align=”left”]

Posted in 雞類 (chicken), 麵食 (pasta), 其他西餐 (Other Western cuisine)

地中海烤雞意粉 (Mediterranean Roast Chicken Pasta)

這個意粉伴了烤雞醬汁後,吸收了所有材料的精華,加上意大利醋,意粉酸酸甜甜,很開胃的。

DSC01827

材料 (Ingredients):

羅勒葉 (Sweet Basil) – 15片 (15 leaves)

百里香 (Thyme) – 3條 (3 strigs)

蕃茄 (Tomato) – 2串 (2 Strigs)

雞 (Chicken) – 800g

水 (Water) – 50ml

橄欖油 (Olive Oil) – 3 Tablespoon

鹽 (Salt) – 1 tablespoon

黑胡椒 (black Pepper) – 1 tablespoon

檸檬 (Lemon) – 1/2個 (half)

意大利黑醋 (Wine Vinegar) – 2 Tablespoons

蒜頭 (Garlic) – Whole

巴馬臣芝士 (Parmesan Cheese)

DSC01828

做法 (Method):

1. 用磨盅把羅勒葉、百里香、鹽及黑胡椒磨碎,然後再加入橄欖油攪勻;
Put all herbs and seasonings into mortar and pestle, bash it all up until oil comes out, then add olive oil and mix it together;

DSC01824 DSC01825

2. 準備一個烤雞盤,把雞放入,將剛磨好的汁倒在雞上,用手把汁均勻地塗滿全隻雞;
Put chicken into baking tray and pull the mixed herbs in the chicken, then rub the mixture on the chicke;n

3. 放入蕃茄、蒜頭及水;
Add tomato, garlic and water in the tray;

DSC01829

4. 200度烤80分鐘;
Roast the chicken in 200 degree for 80 minutes;

DSC01826

5. 於烤雞完成前15分鐘煮好意粉,撈起備用;
Cook pasta before the roast chicken is ready;

6. 準備一隻可放入焗爐的碟,把烤好了的東西從焗爐取出後,先把雞放在準備好的碟,把烤盤內的汁淋少量在雞上,再把雞放入焗爐再烤2分鐘;
Put roasted chicken into another plate, pull some juice and cook roast again for another 2 minutes;

7. 這時,先把烤盤內的蕃茄與柄分離及壓扁,再加入意大利黑醋,開小火煮一下就熄火,然後放入意粉及芝士伴勻,加多幾片羅勒葉
Mesh the roasted tomato a bit, add wine vinegar, open small fire and cook a while, then put cooked pasta, fresh basil and parmesan cheese and mix it up;

8. 烤好的雞取出後切片,放在意粉上就完成了。
take out the chicken from oven and cut some slices, put on the top of the pasta and finished.


[wpedon id=”1981″ align=”left”]