Posted in 小食 (Snacks)

自製焦糖爆谷 (Homemade Caramel Popcorn)

IMG_7657


相信很多人也喜歡吃的一款小食,但很多時也很難做得好,原因在於製作焦糖時的特別竅門,今次就分享給大家吧。至於芝士味爆谷真在研究中,希望遲些可以分享吧。

Everybody loves this snacks, but many people hard to do it in the proper way since there’s a trick when cooking caramel, so let’s do it now.  I’m also trying to make Cheese popcorn, hope can share it later too.


材料 (Ingredients) :


牛油 (Butter) – 1杯 (1 cup)


蔗糖 (raw sugar) – 2杯 (2 cups)


鹽 (salt) – 1茶匙 (1 teaspoon)


粟米糖漿 (corn syrup) – 半杯 (1/2 cup)


梳打粉 (baking soda) – 半茶匙 (1/2 teaspoon)


雲呢拿精華 (Vanilla Extract) – 1茶匙 (1 teaspoon)


做法 (Method):


1. 先預熱焗爐至95度
Prepare oven to 95 degree Celsius


2. 準備一個小鍋,先把牛油溶化
Prepare a small pan, melt the butter first


3. 再加入蔗糖、粟米糖漿及鹽,攪勻
Add raw sugar, corn syrup and salt, stir well


4. 一邊攪拌至煮滾,煮滾後,不要攪,再滾4分鐘,然後關火
Stir it until boil, after boiled, stop stirring and let it cook for 4 minutes, then remove from fire


5. 然後加入梳打粉及雲呢拿精,拌勻
Add baking soda and vanilla extract and stir well


6. 之後倒在爆谷上並伴勻
Pour the caramel over all the popcorn and mix until all popcorn coated


7. 把焦糖爆谷放入焗爐焗1小時,每15分鐘要取出並攪拌一下
Put the coated popcorn into oven and bake for 1 hour, stirring it every 15 minutes


8. 焗好後取出及完全待涼後就可以食用了。
Remove from oven and let it cool down completely, enjoy!


[wpedon id=”1981″ align=”left”]

Posted in 麵食 (pasta), 意大利菜 (Italian Cuisine), 慢煮菜 (Slow cook stew)

最正宗、最傳統的「真。意大利肉醬闊條麵」(The Classic Tagliatelle al Ragu Bolognese)

test_05,-1


可能讀者見到標題會覺得太誇張了,什麼是真肉醬意粉?我們平時吃的不是肉醬意粉嗎? 真肉醬意粉又有什麼不同及特別? 作者就在這篇介紹及分享吧。

Maybe you feel strange when see the title in Chinese, why I’m talking about this? and wondering what’s different between the one we knew and the one I’m sharing, let’s see below explanation :


在意大利,肉醬意粉是週末家人聚會必吃的菜式,而這菜式亦已註冊成為一個有標準份量、材料及煮法,一般的肉醬菜式只可稱為Ragu,亦有很多食材選擇及煮法,只有用上在意大利Bologna這個地方的煮法才可稱為Ragu Bolognese。

First, Ragu dishes is the most important dish for family gathering every weekend in Italy, however, this dish had been registered as a standard method of ingredients and cooking method, there are many ragu cooking methods which using other ingredients, this only can called “Ragu”; The only cooking method that created by the place called Bologna can only be called “Ragu Bolognese”


另外,之前也有文章說過關於不同意大利粉的分別,然而,意大利人對意粉的用法其實很講究,而這款菜式在意大利一定要用上闊條麵,用來把肉醬掛在意粉上一起食用。

On the other hand, there are vary pastas in Italy, they are using specific pasta for special sauces, so, this Ragu Bolognese must have to use Tagliatelle pasta for the dish.


可是,這菜式在世界各地流傳下,已變奏出不同版本,已經不再是本身的味道;老實說,作者由小到大在香港吃的肉醬意粉也是濃濃的番茄汁味及醬汁很多的版本,而英文卻永遠寫 Spaghetti Bolognese; 然而,現在學習中的真正意大利菜色才知道我們香港的版本一直是錯誤的版本,所以今次作者分享真正的肉醬闊條麵材料及做法,希望讀者知道真正的味道。

This ragu dishes is very famous all over the world, unfortunately, this is not like the original one in other countries we are tasting nowadays.  In Hong Kong, I’m having this dish which taste so many ketchup and so full of red sauce on it, and so called “Spaghetti Bolognese” in many restaurant menus.  However, I only knew that I’m eating a wrong version since child when I’m now studying Italian cuisine, therefore, I would like to share the original method of the REAL Tagliatelle al Ragu Bolognese in this post.


材料 (Ingredients) :


牛油 (Butter) – 55g


意大利咸肉 (Pancetta) – 55g


免治牛肉 (Minced beef) – 100g


免治豬肉 (Minced pork) – 100g


洋蔥 (Onion) – 1pc


紅蘿蔔 (Carrots) – 1pc


西芹 (Celery) – 1pc


牛肉湯 (Beef stock) – little


番茄膏 (Tomato paste) – 3 tablespoons


紅酒 (Red wine) – 1 glass


巴馬臣芝士 (Parmesan Cheese) – few


鹽 (Salt) – little


黑胡椒 (Black pepper) – little

DSC02218


做法 (Method) :


1. 把所有蔬菜切成小粒、意大利咸肉也切成小粒
Cut all the vegetables into a small cubes, pancetta also cut into small cubes

DSC02219


2. 準備一個大鍋,下牛油,待牛油溶化一會,加入意大利咸肉略炒至出油及微香
Prepare a big pan, add butter, then put the pancetta in and stir until little oil comes out and little brown

DSC02221


3. 加入洋蔥炒至軟身,然後加入其他蔬菜炒勻
Add onion, and stir until soft, then add other vegetables, stir well

DSC02223


4. 加入所有免治肉炒至變為啡色
Add all meats and stir until meats turn brown colour

DSC02224


5. 倒入紅酒並待一會至酒精揮發
Pour in the red wine and let the alcohol evaporate a while

DSC02225


6. 把番茄膏加入少許牛肉湯,溶化後加入鍋內,伴勻
Use the beef stock to dilute tomato paste, then put them into the pot and stir well

DSC02226


7. 再加入牛肉湯蓋過肉醬後,轉小火,慢煮1.5小時,中途要留意水量,如果太乾就加少許牛肉湯並輕輕攪拌以免舔底
Pour the beef stock to cover the meat, turn the gas to very very small and slow cook for 1.5 hours, monitor it for sometimes, if too dry, just add some beef stock on it, better stir a little some times too.

DSC02227


8. 加鹽及黑胡椒並試味,最後灑上芝士就可以了。
Add salt and black pepper, taste it, finally put the cheese on the top, finished.

DSC02228


[wpedon id=”1981″ align=”left”]

Posted in 甜品 (Desserts)

意大利芝士凍餅 (Homemade Tiramisu)

IMG_7645

IMG_6459


作者一向對甜食沒有太大的興趣,所以很少做甜品,但這個甜品卻是作者的最愛,每次吃後也很滿足及開心。然而,這個甜品亦很容易做,又免焗,做好後放在雪櫃12小時後就可以吃,分量可多少,多則可以用一個長形或正方形盤盛裝,少則可以用酒杯也很精緻吧。

Acutally, desserts is not my cup of tea indeed, so i’m rare to make dessert at home, however, tiramisu is the only one favourite dessert that I fall in love with it. Generally tiramisu is one of the easy cake that make at home, it’s no need to bake, just mix all the ingredients and fridge it for 12 hour, that’s so easy right? and you can either make in a large container or as little as just a wine glass also perfect for this dessert.

材料 (Ingredients):


意大利甜品專用軟芝士 (Mascapone Cheese) – 500g (for large container) or 250g (for 2 cups of wine glass)


雞蛋 (egg) – 2 pcs (large container) or 1 pcs (for 2 cups of wine glass)


意大利手指甜餅 (lady fingers biscuits) – 15 pcs (for large container) or 6-8 pcs (for 2 cups of glass and break into half)


雲呢拿香精 (vanilla extract) – few drops


雲呢拿糖 (vanilla sugar) – 4-6 teaspoons or 2-3 teaspoons


咖啡酒 (Kahula liqueur) – few drops


黑咖啡 (Expresso) – 3 x 110ml (for large container) or 1 x 110ml (for 2 cups of wine glass)


鹽 (salt) – very few


牛奶 (milk) – few drops


朱古力粉 (cocoa powder)

DSC02200


做法 (Method) :


1. 準備兩個大碗,將雞蛋分為蛋白及蛋黃
Prepare 2 big bowl, separate egg white and egg yolks

DSC02202


2. 把雲呢拿糖及雲呢拿香精加入蛋黃中並攪勻
Add in the vanilla sugar and vanilla extract into the egg yolks and well mix it

DSC02204


3. 再加入意大利軟芝士再次攪勻,如果攪不開芝士,可以加少量牛奶,攪至成漿狀就可以了
Add the mascarpone cheese and mix it well again, if the cheese is too hard, then add some milk to dilute it until it look likes cream form

DSC02205


4. 如果讀者唔想浪費蛋白,就可以做多一個步驟,把蛋白加少許鹽,打至蛋白企身,翻轉碗也不會掉下來就可以了
If you don’t want to waste the egg whites, you can do this steps, otherwise you can skip it : add very little salt in the egg whites and beat it until very firm like mousses


5. 把打好的蛋白加入芝士漿,伴勻
Add the firmed egg white into the cheese cream and fold it well


6. 準備一個盤,把黑咖啡倒入,加入糖及咖啡酒,攪勻
Prepare another small container, pour in expresso ,add sugar and Kahula liqueur and mix well

DSC02201


7. 把手指甜餅一個一個的輕輕沾滿咖啡,不要太多,不然甜點變得淋身就不好吃了
Dip the biscuits into coffee mixture, not too wet, just a little dipping


8. 然後把沾好的手指甜餅排放好入存放的盤或酒杯內
Put the dipped biscuits into your container or wine glass one by one in the bottom layer


9. 再倒入芝士漿,把漿平均地鋪好一層
Pour the cheese mixture on the top of the biscuits and spread it well over the container


10. 重複以上兩個步驟,一般三層就可以了
Repeat the above 2 steps again, generally will make 3 layers


11. 最後平均地打朱古力粉灑在芝士漿面
After complete all layers, dust the cocoa powder on the top

DSC02206


12. 放在雪櫃12小時就可以享用了。
Let it sit in the refrigerator for 12 hours and enjoy.


[wpedon id=”1981″ align=”left”]

Posted in 灌腸器 (Sausage Stuffer), 醃製及煙燻 (Curing and Smoking), 豬肉 (Pork), 攪肉機 (Meat Grinder)

自製醃肉及煙燻篇 - 香腸 (HOMEMADE CURING AND SMOKING – Sausage)

IMG_6660


續上一篇醃豬肉,今次做香腸。作者所說的是豬肉腸,因為小編與愛人喜歡吃意大利香腸,而意大利大多用豬肉做的。 做香腸肉的部位是豬肩肉,但豬肩肉也比較瘦,所以作者建議加小量肥肉,做出來的口感比較滑及不會乾。先說工具,我們需要一個攪肉機、灌腸器及豬腸衣。 至於腸衣有兩款,一是從肉檔買回來的新鮮豬腸,但卻需要自行清洗及去除腸內的髒物;二是買風乾了的腸衣,只是做香腸前把腸衣灑上鹽,然後浸水半小時就可以了。 讀者也可以做火腿的,但火腿需要買牛腸衣做的。 此外,讀者亦可做意大利臘腸,腸衣亦是用牛腸衣,做好後放在陰涼處風乾6星期左右就可以了。

Continue for the last curing and smoking post of pork, this post is talk about sausage. Actually I and my beloved one really love to eat Italian sausage, and most of them are using pork. The meat of sausage is using pork shoulder/boson butt, but this part is not enough fat to make sausage, so better ask your butcher to give you some lard and add on it, then your sausage will more tender and juicy. Well, talk about the equipment, this time, we need meat grinder, sausage stuffer and natural hog casing. For the hog casing, you can either bought fresh one from butcher, but you have to wash and clean the dirty things out yourself, or buy the dried natural hog casing, the dried one just add some salt and put it into the water for half hour. If you like to eat ham, you can do it as well, but you have to find beef round intestines. Also, you can make salami too, it’s also using beef round casing, making method is the same, but you have to drying-on-air about 6 weeks to finish it.

由於只是小量製作,所以作者建議選用手動的機器作嘗試,當讀者想做大量時才買電動也可以:
Since we are just make small amount of sausage, so I suggested to use manual machines to make it first, once you gonna make mass production, you can buy electric one  :


手動工具 ~

攪肉機 (Meat Grinder) :

ヘルシーミンサー DK-0580

灌腸器 (Sausage Stuffer) :

ソーセージメーカーセット DK-0524


電動工具 ~

電動攪肉及灌腸機


腸衣 (Dried Hog cashing) :

天然豚腸フランクフルト用 分包4個 1袋約2m


做法 (Method):


1. 用一個小碗,把乾腸衣灑上鹽,放在清水浸半小時,備用
Prepare a small bowl, add some salt in the dried hog casing and put it into water for half hour, set aside


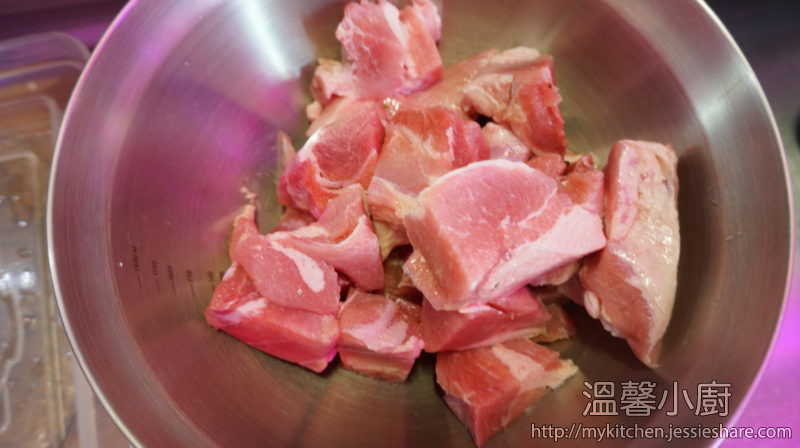
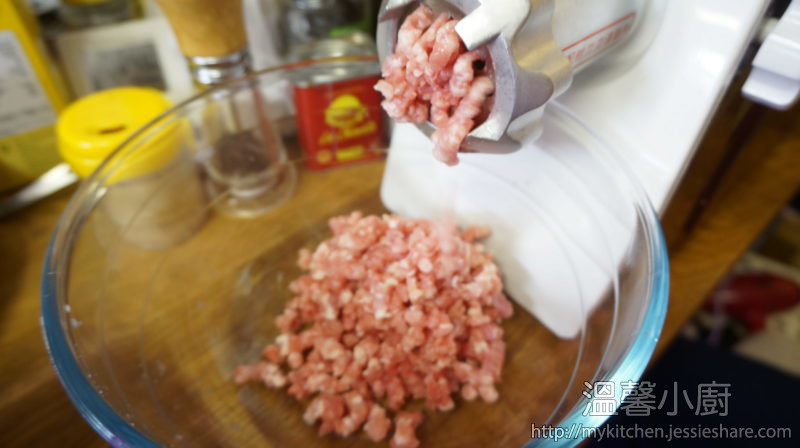
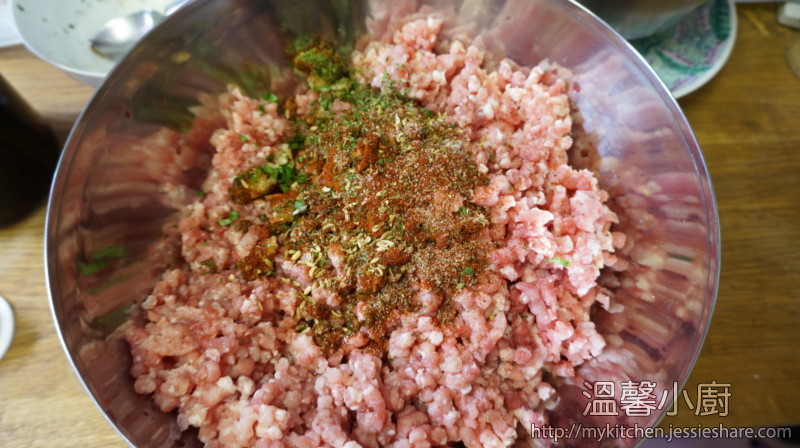
2. 清洗豬肉,印乾水份,切成小粒,用攪肉機攪成免治豬肉;肥肉切成小粒後,加入免治肉撈勻
Wash the meat and dry it using paper or towel, cut it into chunk, use the meat grinder to make ground meat; the fat one cut into a small chunk and mix with ground meat

DSC02166

DSC02167


3.  將鹽、黑胡椒粉、茴香籽、蒜蓉、甜椒粉、蕃茜、百里香、紅椒粉、八角、紅酒加入免治肉內撈勻,如果讀者也是想做意大利香腸,可以跟小編的香料,或可自行選擇自己喜歡的香料作調味
Mix salt, black pepper, fennel seeds, minced garlic, paprika, parlsey, thyme, red pepper, star anise and red wine with the ground meat if you wanna do Italian sausages, otherwise you can add your own seasonings

DSC02168


5. 調味好請先取小量肉,用平底鍋煎熟後,先自行試味,調好自己適合的味道就可以灌腸
After mixed it all up, get a little quantity and use a saucepan to cook it and taste it, if it is OK, then you can prepare stuffing


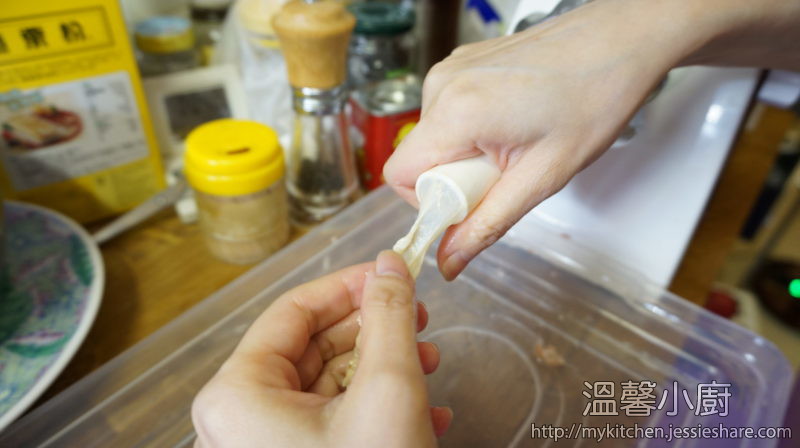
6. 灌腸前,把浸軟的腸衣套上灌腸器的長咀口上
Before stuffing, put the soft hog casing into the sausage stuffing machine

DSC02169


7. 把調好的免治肉塞內灌腸器肉,先慢慢地把肉唧出咀口,當免治肉唧出後,在腸衣的頭部打一個結,以免肉醬留出
Put the ground meat into the stuffing machine and push slowly, when you can see the ground meat at the end, just make a knot for the hog casing


8. 慢慢地把肉醬唧入腸衣,不能太快,太快會唧出太多空氣,腸衣會破裂,那就要剪掉破裂的那段,再重新開始過
push the ground meat into hog casing slowly, don’t push too fast, otherwise so many air comes into the cashing and will blow away, if so, just cut out the blow area and stuff again


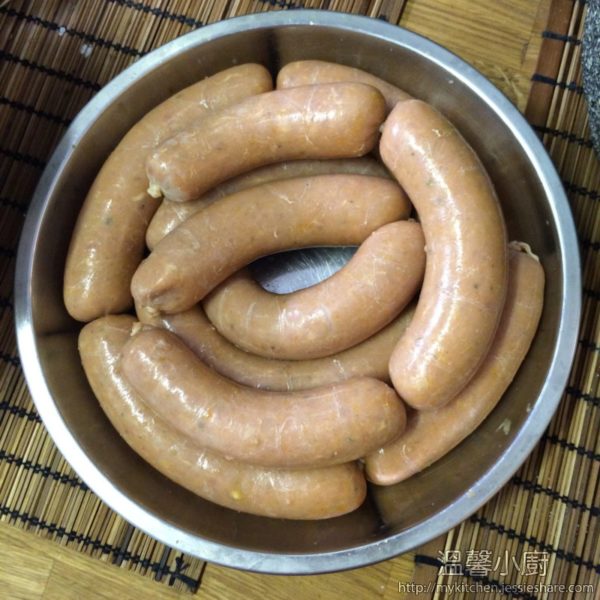
9. 把所有肉也套入腸衣後,先在尾部打個結,把腸平放在枱上,用叉在腸衣上輕輕的坪均地叉小孔,平均地用手指壓在分割腸的大小
After stuffed all the meat into the casing, tie a knot at the end and put the sausage in the table, use your fingers to pin the sausage size


10. 平均分好後,一段一段地輕輕地在按壓位置上扭幾下,每一段要與上一段反方向扭轉才行,這樣香腸就做好了。
After pinned, use your hand to twist few times on every single sausage, every pin is twisted opposite it for the previous one, until finished.

IMG_6660


11. 最好用分小包用真空機包裝好,放在冰箱內存放。
After finished, better packed with vacuum seal for small quantity, then put it into your freezer.

溫馨提示 : 買回來的肉先放入冰箱雪至硬身才可以做,因為肉類在室溫下容易滋生細菌及變得似爛肉,那香腸就會失敗了。
Warming Tips : Put your meat into freezer until it becomes hard, so it not easy to get bacteria and too soft when making sausages, otherwise it will be failed.


[wpedon id=”1981″ align=”left”]

Posted in 食物處理器 (Food Processor), 工具及廚具 (Utensils and Kitchen Equipments), 果醬 (Jam)

自製花生醬 (Homemade Peanut Butter)

IMG_7316


對於花生醬,作者由小到大都不喜歡吃,總覺得有些怪怪的味道,但自愛人親自做過後,作者試了一口,竟然沒有現成的那種怪味,還愛上吃花生醬,現時作者每天的早餐除了吃自製果醬外,加入了花生醬作為另一選擇。但注意,由於沒有添加劑,做好的花生醬需於2星期內吃完,不然會變壞的。

Actually I don’t like peanut butter since child, because I felt there is a bad smell, however, when my beloved one tried to made it once, after my first taste, I can’t find that bad smell again and begin to love with it, so other than jam, this is my second option to enjoy with my breakfast everyday. However, since this is homemade without preservation, please consume it within 2 weeks.


材料 (Ingredients) :


有機花生 (Organic Peanuts)

蜜糖 (Honey)

鹽 (sea salt)

花生油或菜油(Peanut oil/Vegetable Oil )


做法 (Method) :


1. 先將花生用焗爐或平底鍋烘焙至出香味及有少許金黃色
Roast the peanut either using oven or pan until you can smell it and a little bit brown colour

IMG_7375


2. 取出放涼後,把花生放在一個膠袋中,並用手把花生衣搓出
Let it cool down, then pour the peanuts into a plastic bag, and rub out the peanut coat


3. 耐心地揀出已去衣的花生後,放入食物處理器或攪拌器
take out the peeled peanuts patiently, then pour the peanuts into the food processor/blender, blend it around 10 second

IMG_7379


4. 然後再加入花生油、蜜糖及鹽,打至喜歡的幼滑度就可以了
Then, add peanut oil, honey and sea salt, and blend until the consistency you like


5. 最後試味是否適合自己,如加了調味就轉動幾下以便攪勻。
Taste it and tone your favourite taste and mix it well.


溫馨提示 : 如讀者喜歡有花生碎,記得在烘焙後先預留一些,當做好花生醬後加入及手動攪拌就可以了。
Warming Tips : If you wanna get chunky peanut butter, you have to reserve little quantity after roasted the peanuts, then add and mix by hand after the peanut butter finished.


[wpedon id=”1981″ align=”left”]